

V1.1 | September 2026
1. Product Introduction
The TY Series is Nablai's AI module for brands going global. Built on the Tuya IoT platform, it features AI voice interaction, emotion recognition and on-device ASR (Chinese/English). It supports Wi-Fi + BLE provisioning, and can connect independently through an optional 4G Cat.1 module. It also supports touch sensing, gravity sensing, vibration feedback, local TF card playback and camera vision.
1.1 Comparison of the Four Editions
| Feature | TY-D Base edition |
TY-A Advanced edition |
TY-F Full edition |
TY-S Vision edition |
|---|---|---|---|---|
| AI voice conversation | ✓ | ✓ | ✓ | ✓ |
| Emotion Eyes (dual screens) | ✓ | ✓ | ✓ | ✓ |
| On-device ASR (Chinese/English) | ✓ | ✓ | ✓ | ✓ |
| Touch sensing | — | ✓ | ✓ | ✓ |
| Gravity sensing | — | ✓ | ✓ | ✓ |
| Vibration feedback | — | ✓ | ✓ | ✓ |
| Local TF card playback | — | — | ✓ | ✓ |
| Camera vision | — | — | — | ✓ |
| 4G Cat.1 connectivity | Optional | Optional | Optional | Optional |
1.2 Comparing the three form factors
| Item | TY001 split version | TY002 all-in-one version | TY003 Sphere Edition |
|---|---|---|---|
| Form factor | Main unit and panel separate | Main unit and panel integrated | Spherical all-in-one housing |
| Main unit dimensions | 3.9 × 4.0 × 3.0 cm | 5.4 × 4.3 × 3.0 cm | Spherical housing |
| Switch type | Slide switch | Power button / MODE button | Power / Mode button (dual-purpose) |
| Network reset | Toggle the switch 3 times in a row | Press and hold MODE button for 7 seconds | Press the Power / Mode button rapidly and repeatedly 3 times in a row |
| Battery | 600 mAh | 1000 mAh | 1200 mAh |
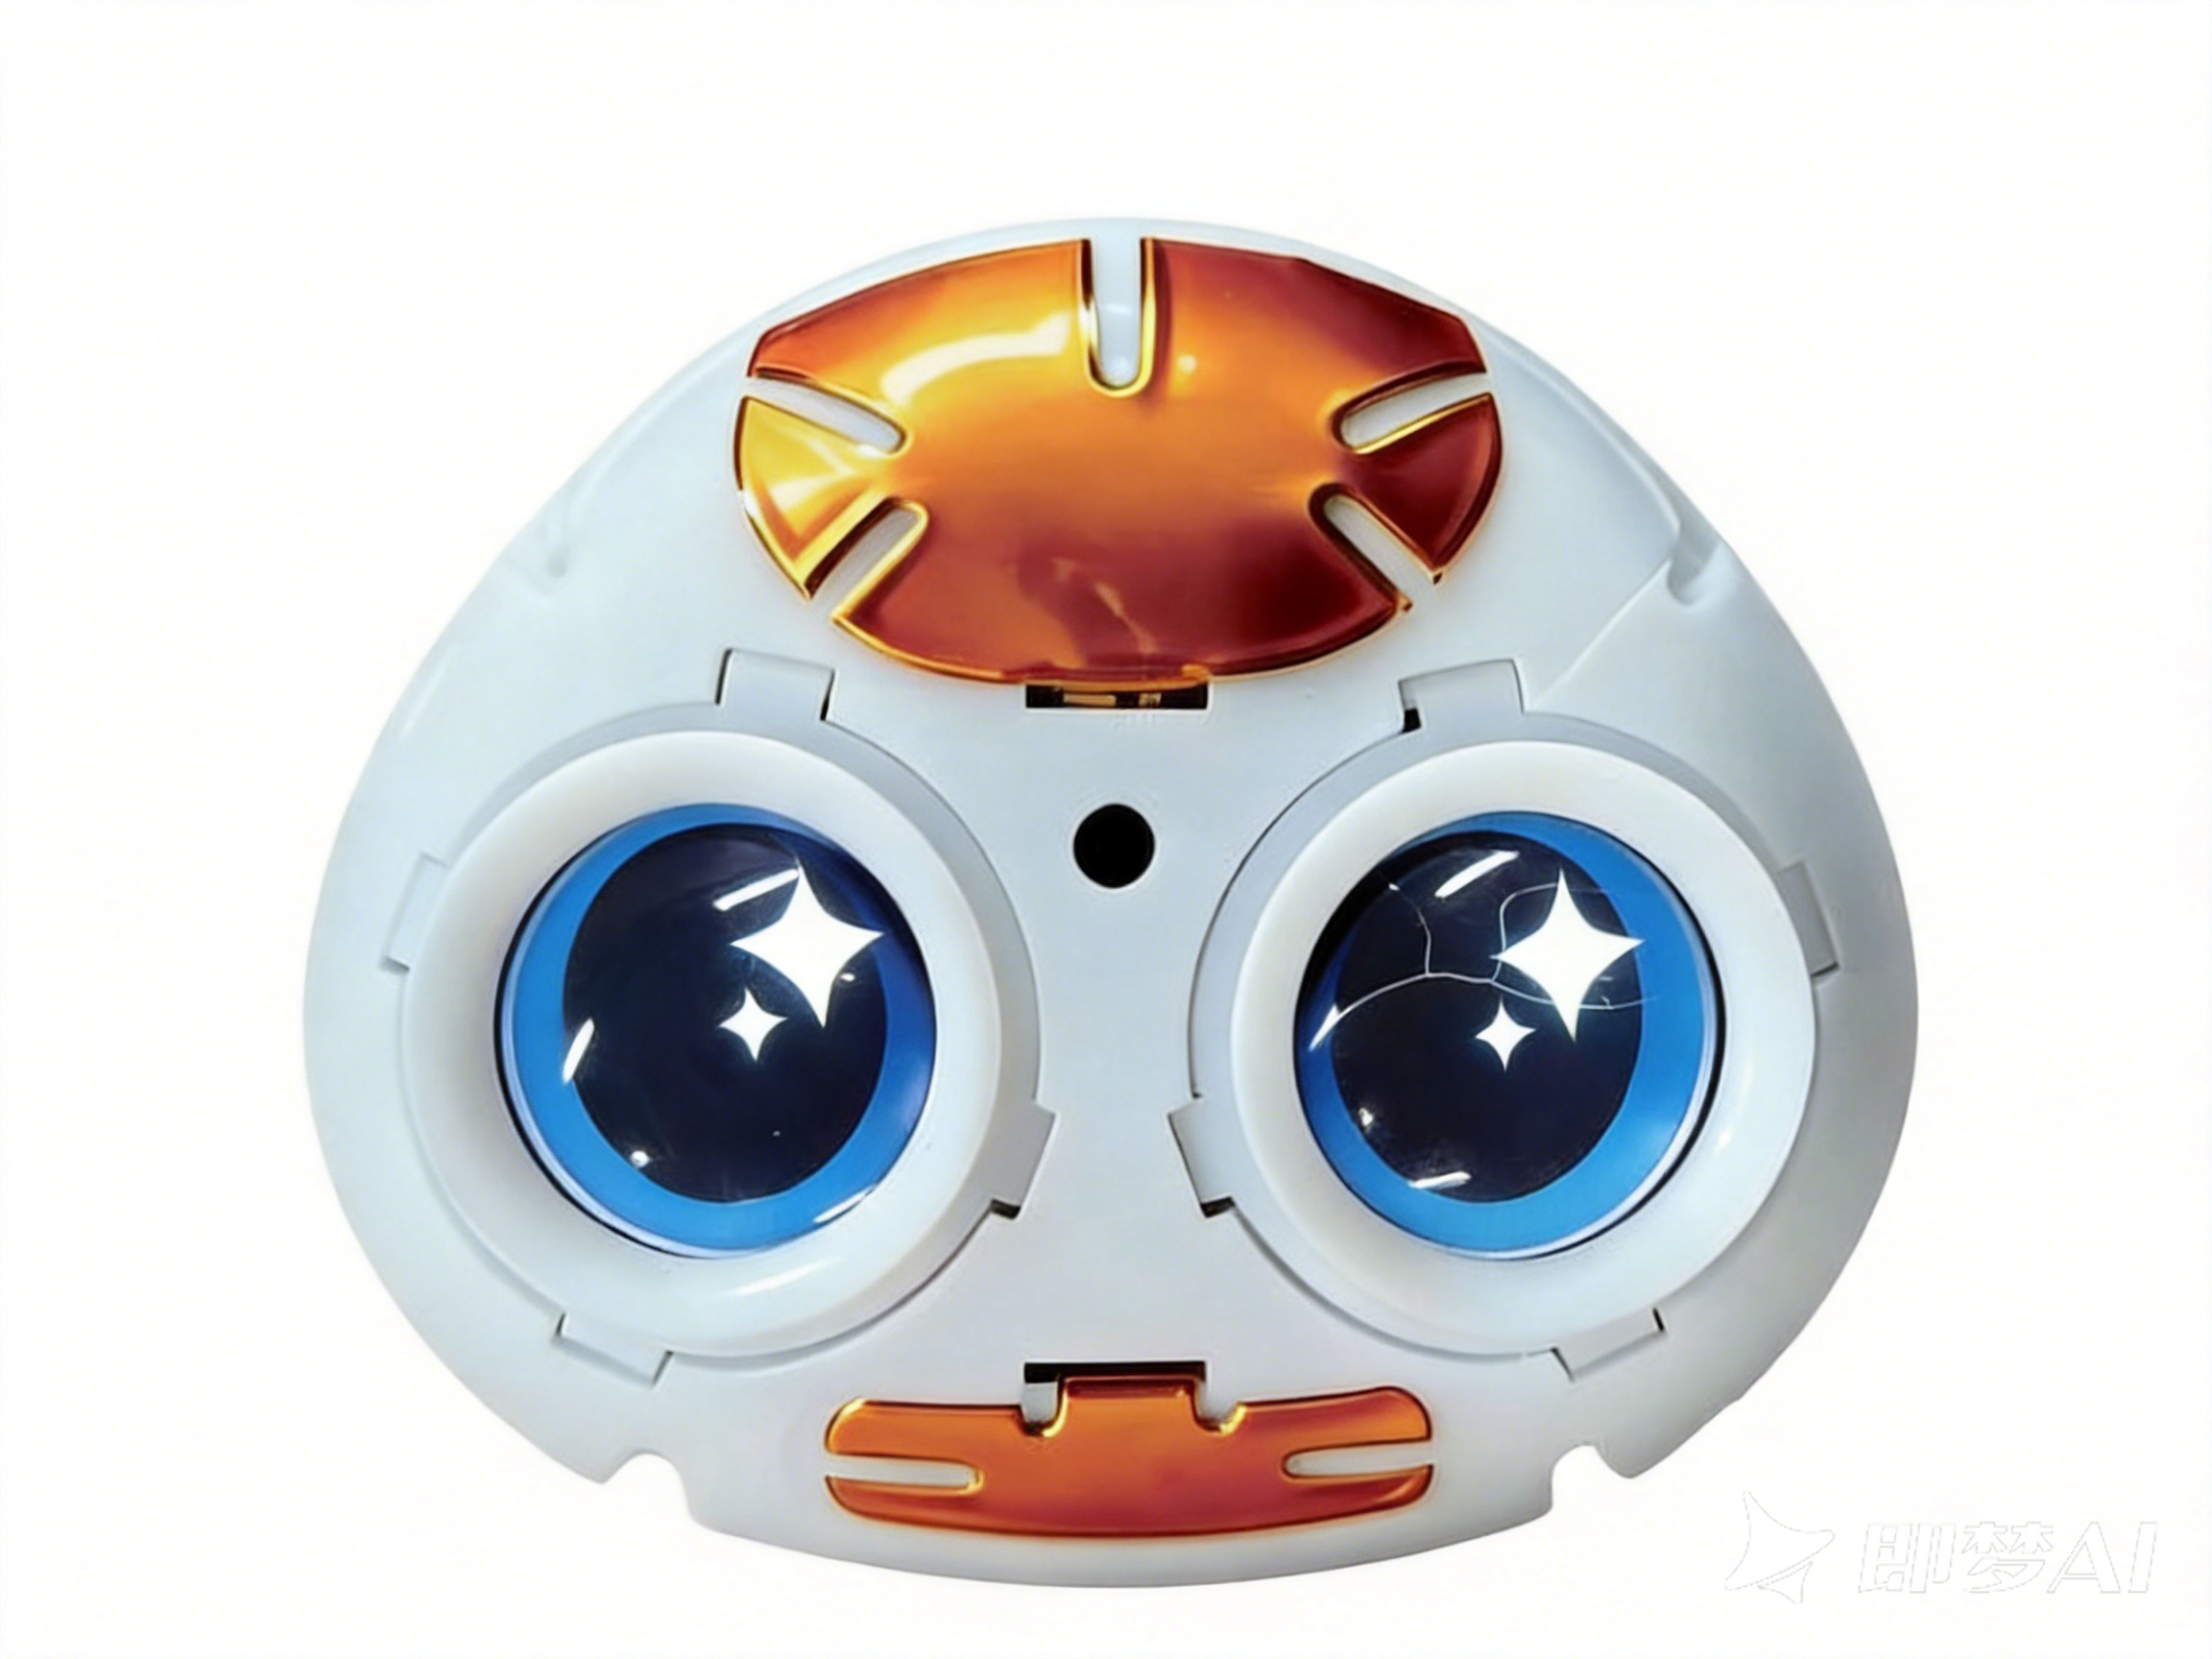
1.3 Product Appearance


1.4 Control panel and buttons
The control panel layout and button definitions for each TY Series form factor are listed below. Match them to the operation you need.
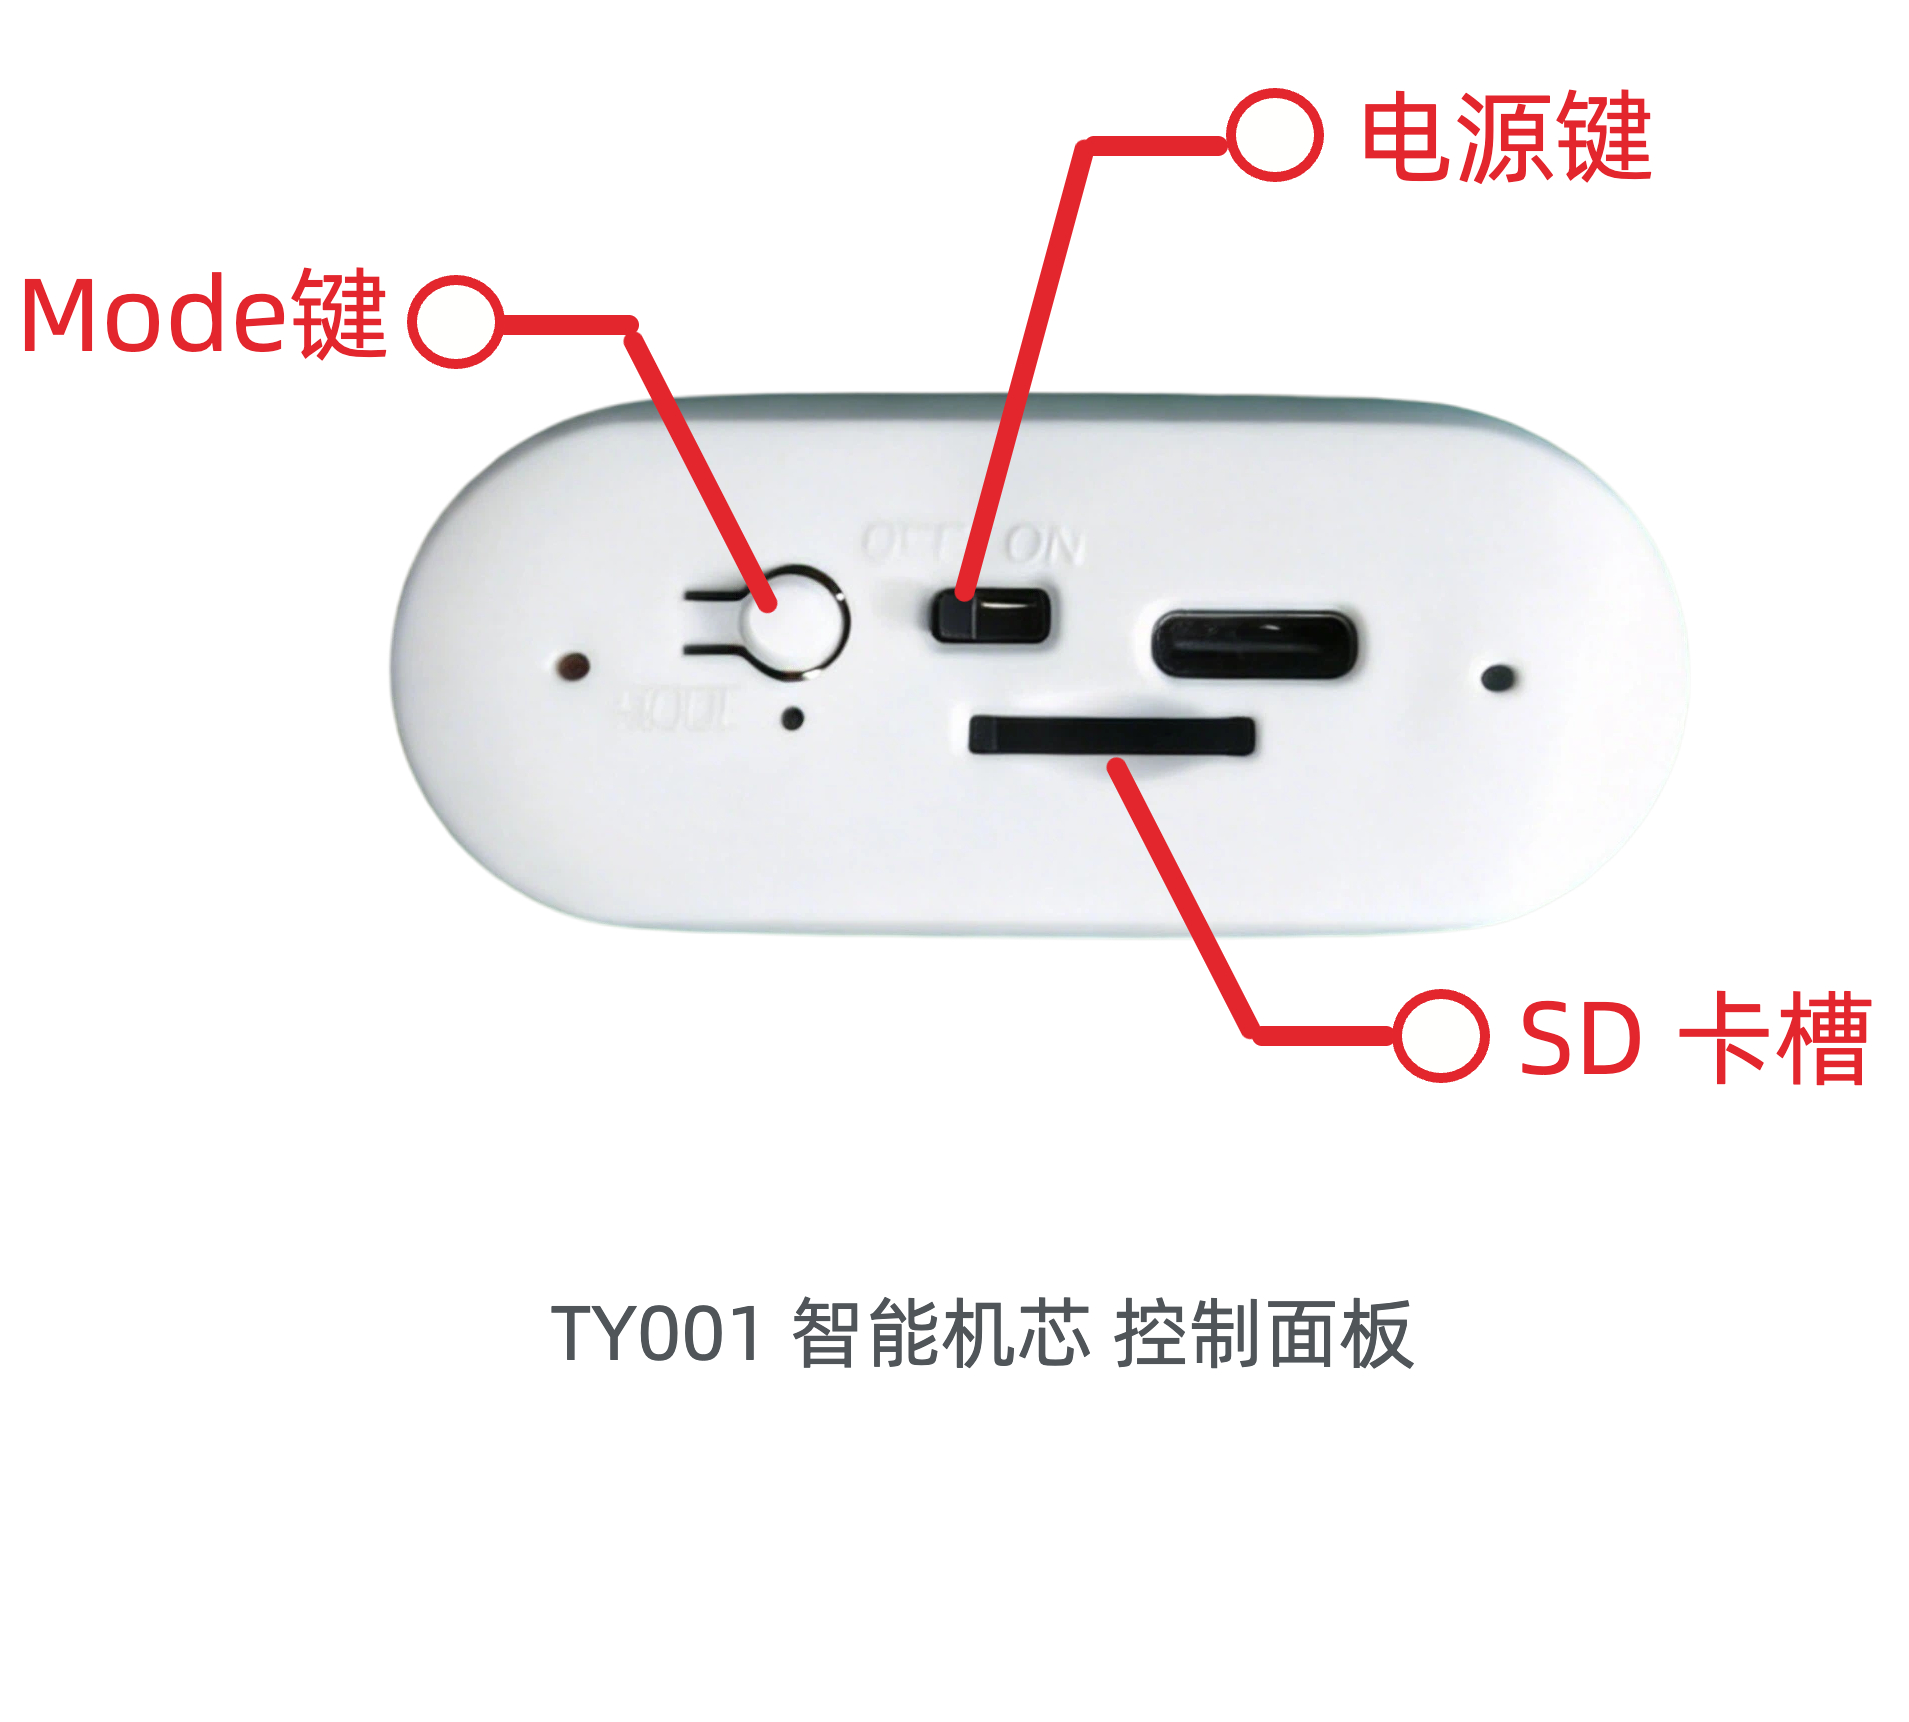
TY001 (split version)
| Action | Description |
|---|---|
| Power on | Slide the switch to ON |
| Power off | Slide the switch to OFF |
| Network configuration | Toggle the switch 3 times in a row (wait for the screen to light up and go dark each time) |
| Mode switching | Double-press the Mode button (cycles between push-to-talk, free conversation and playback mode; playback mode is supported only on the F / S editions) |
| Button wake | Single-press the Mode button (wakes the module from standby without using the voice wake word) |
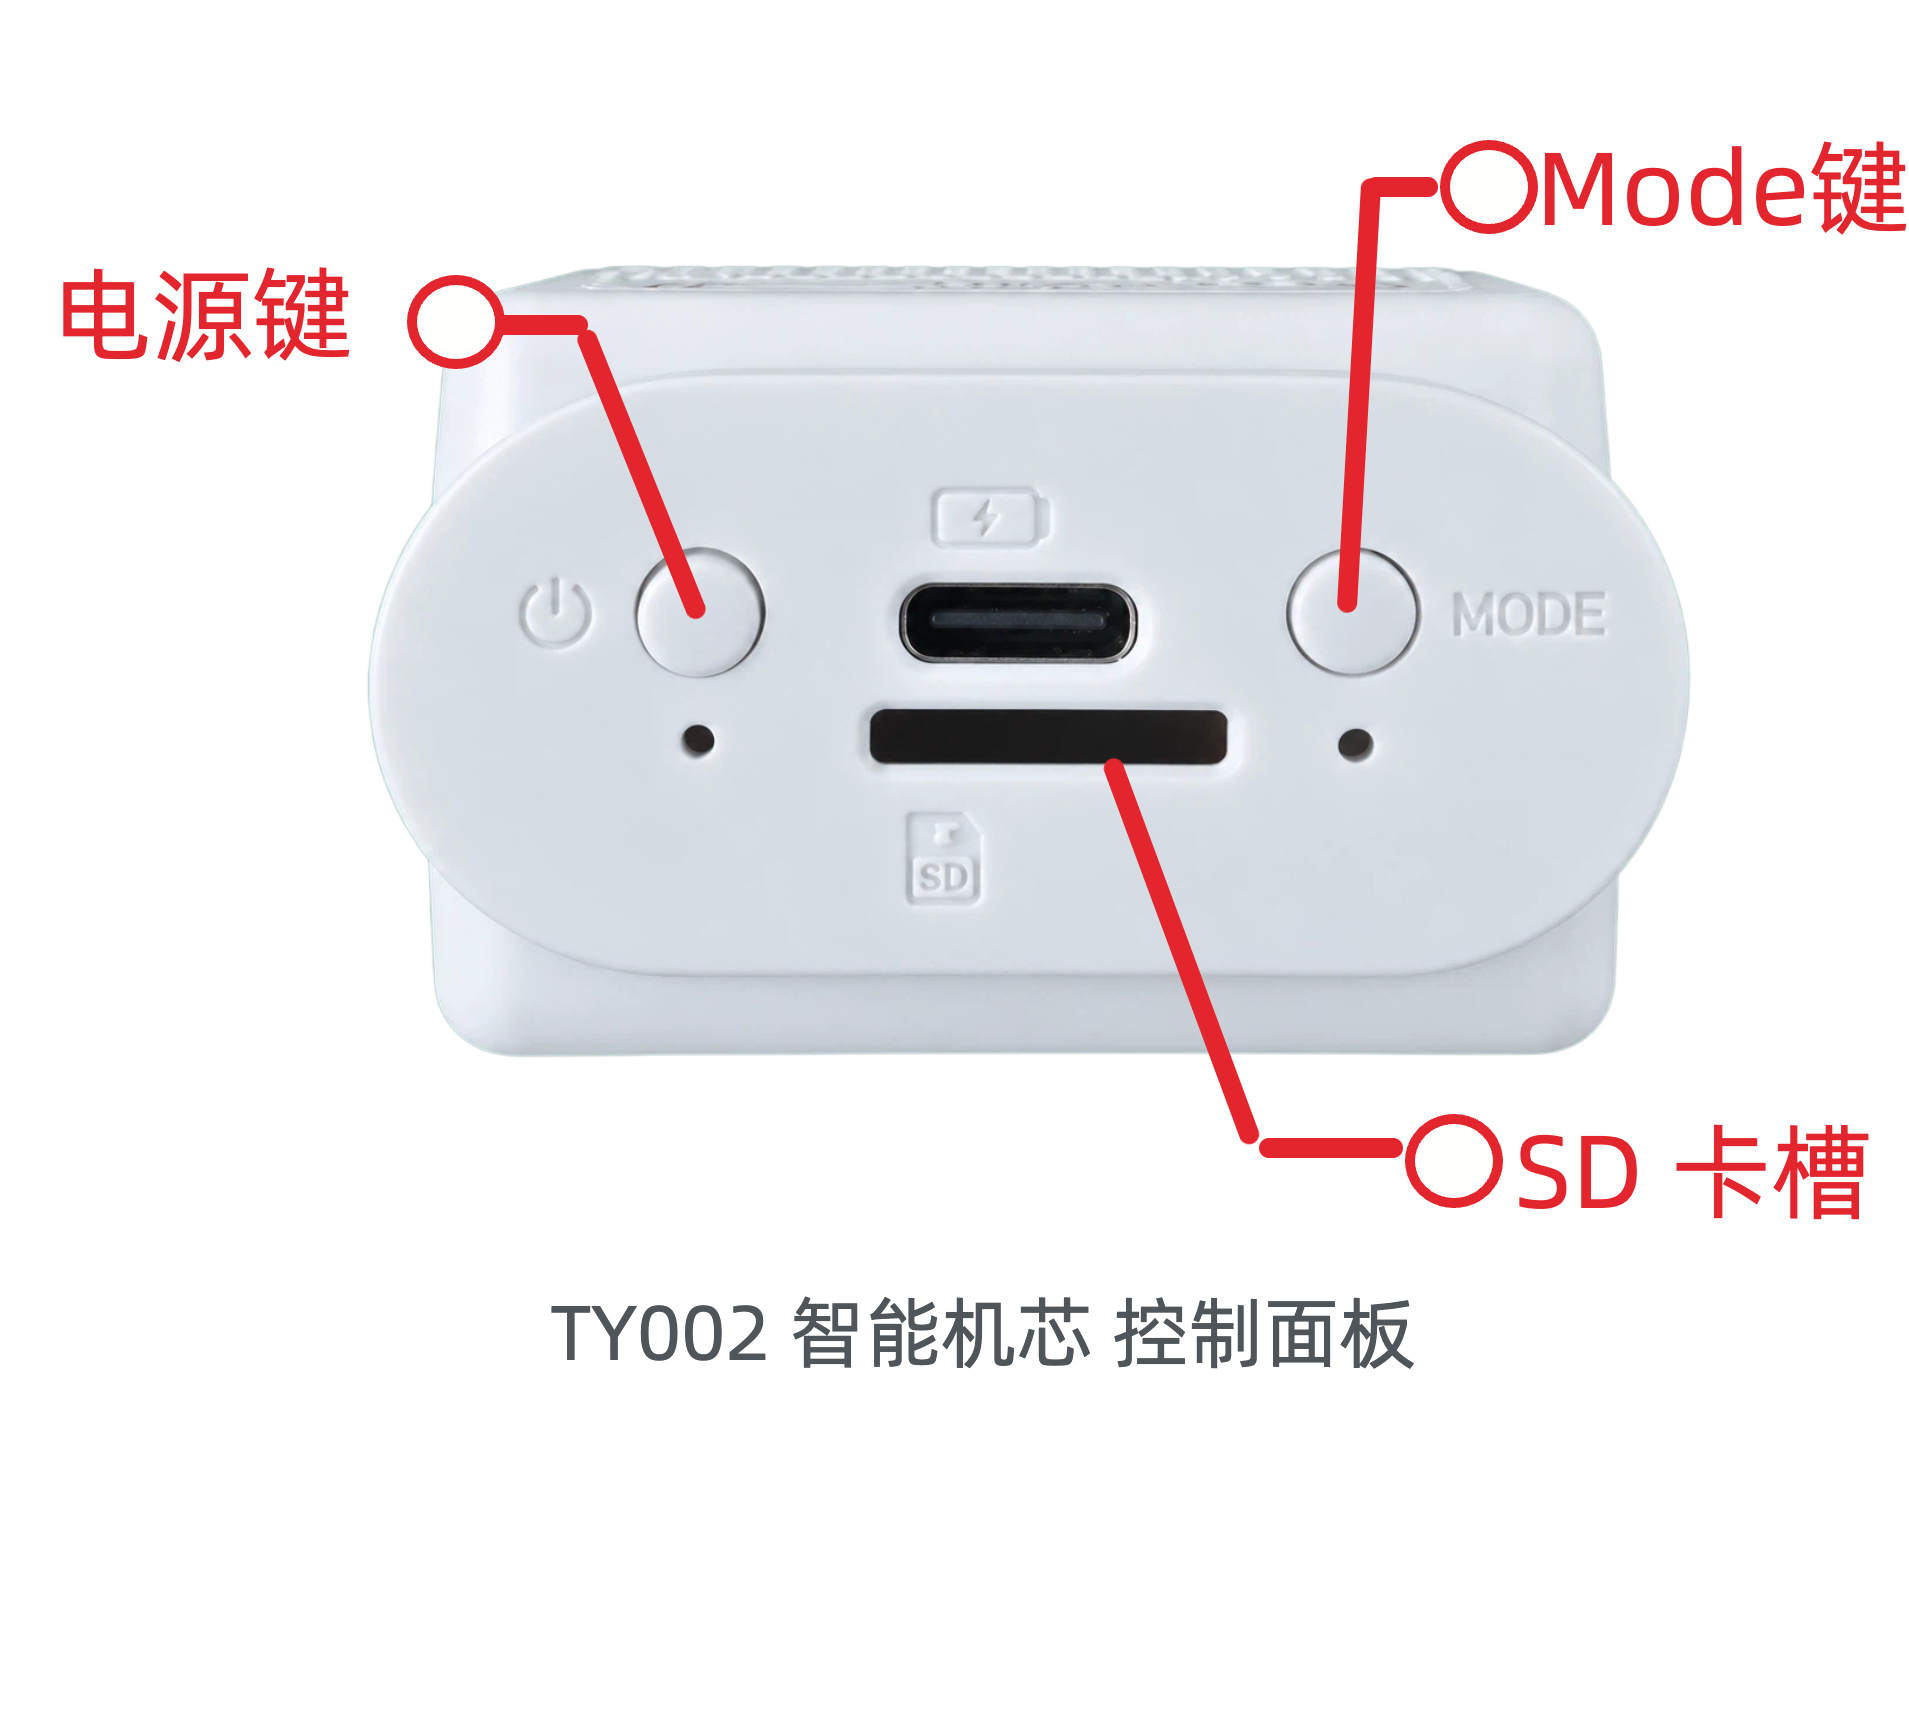
TY002 (all-in-one version)
| Action | Description |
|---|---|
| Power on | Press and hold the power button |
| Power off | Press and hold the power button |
| Network configuration | Press and hold the Mode button for 7 seconds until the device restarts |
| Mode switching | Double-press the Mode button (cycles between push-to-talk, free conversation and playback mode; playback mode is supported only on the F / S editions) |
| Button wake | Single-press the Mode button (wakes the module from standby without using the voice wake word) |
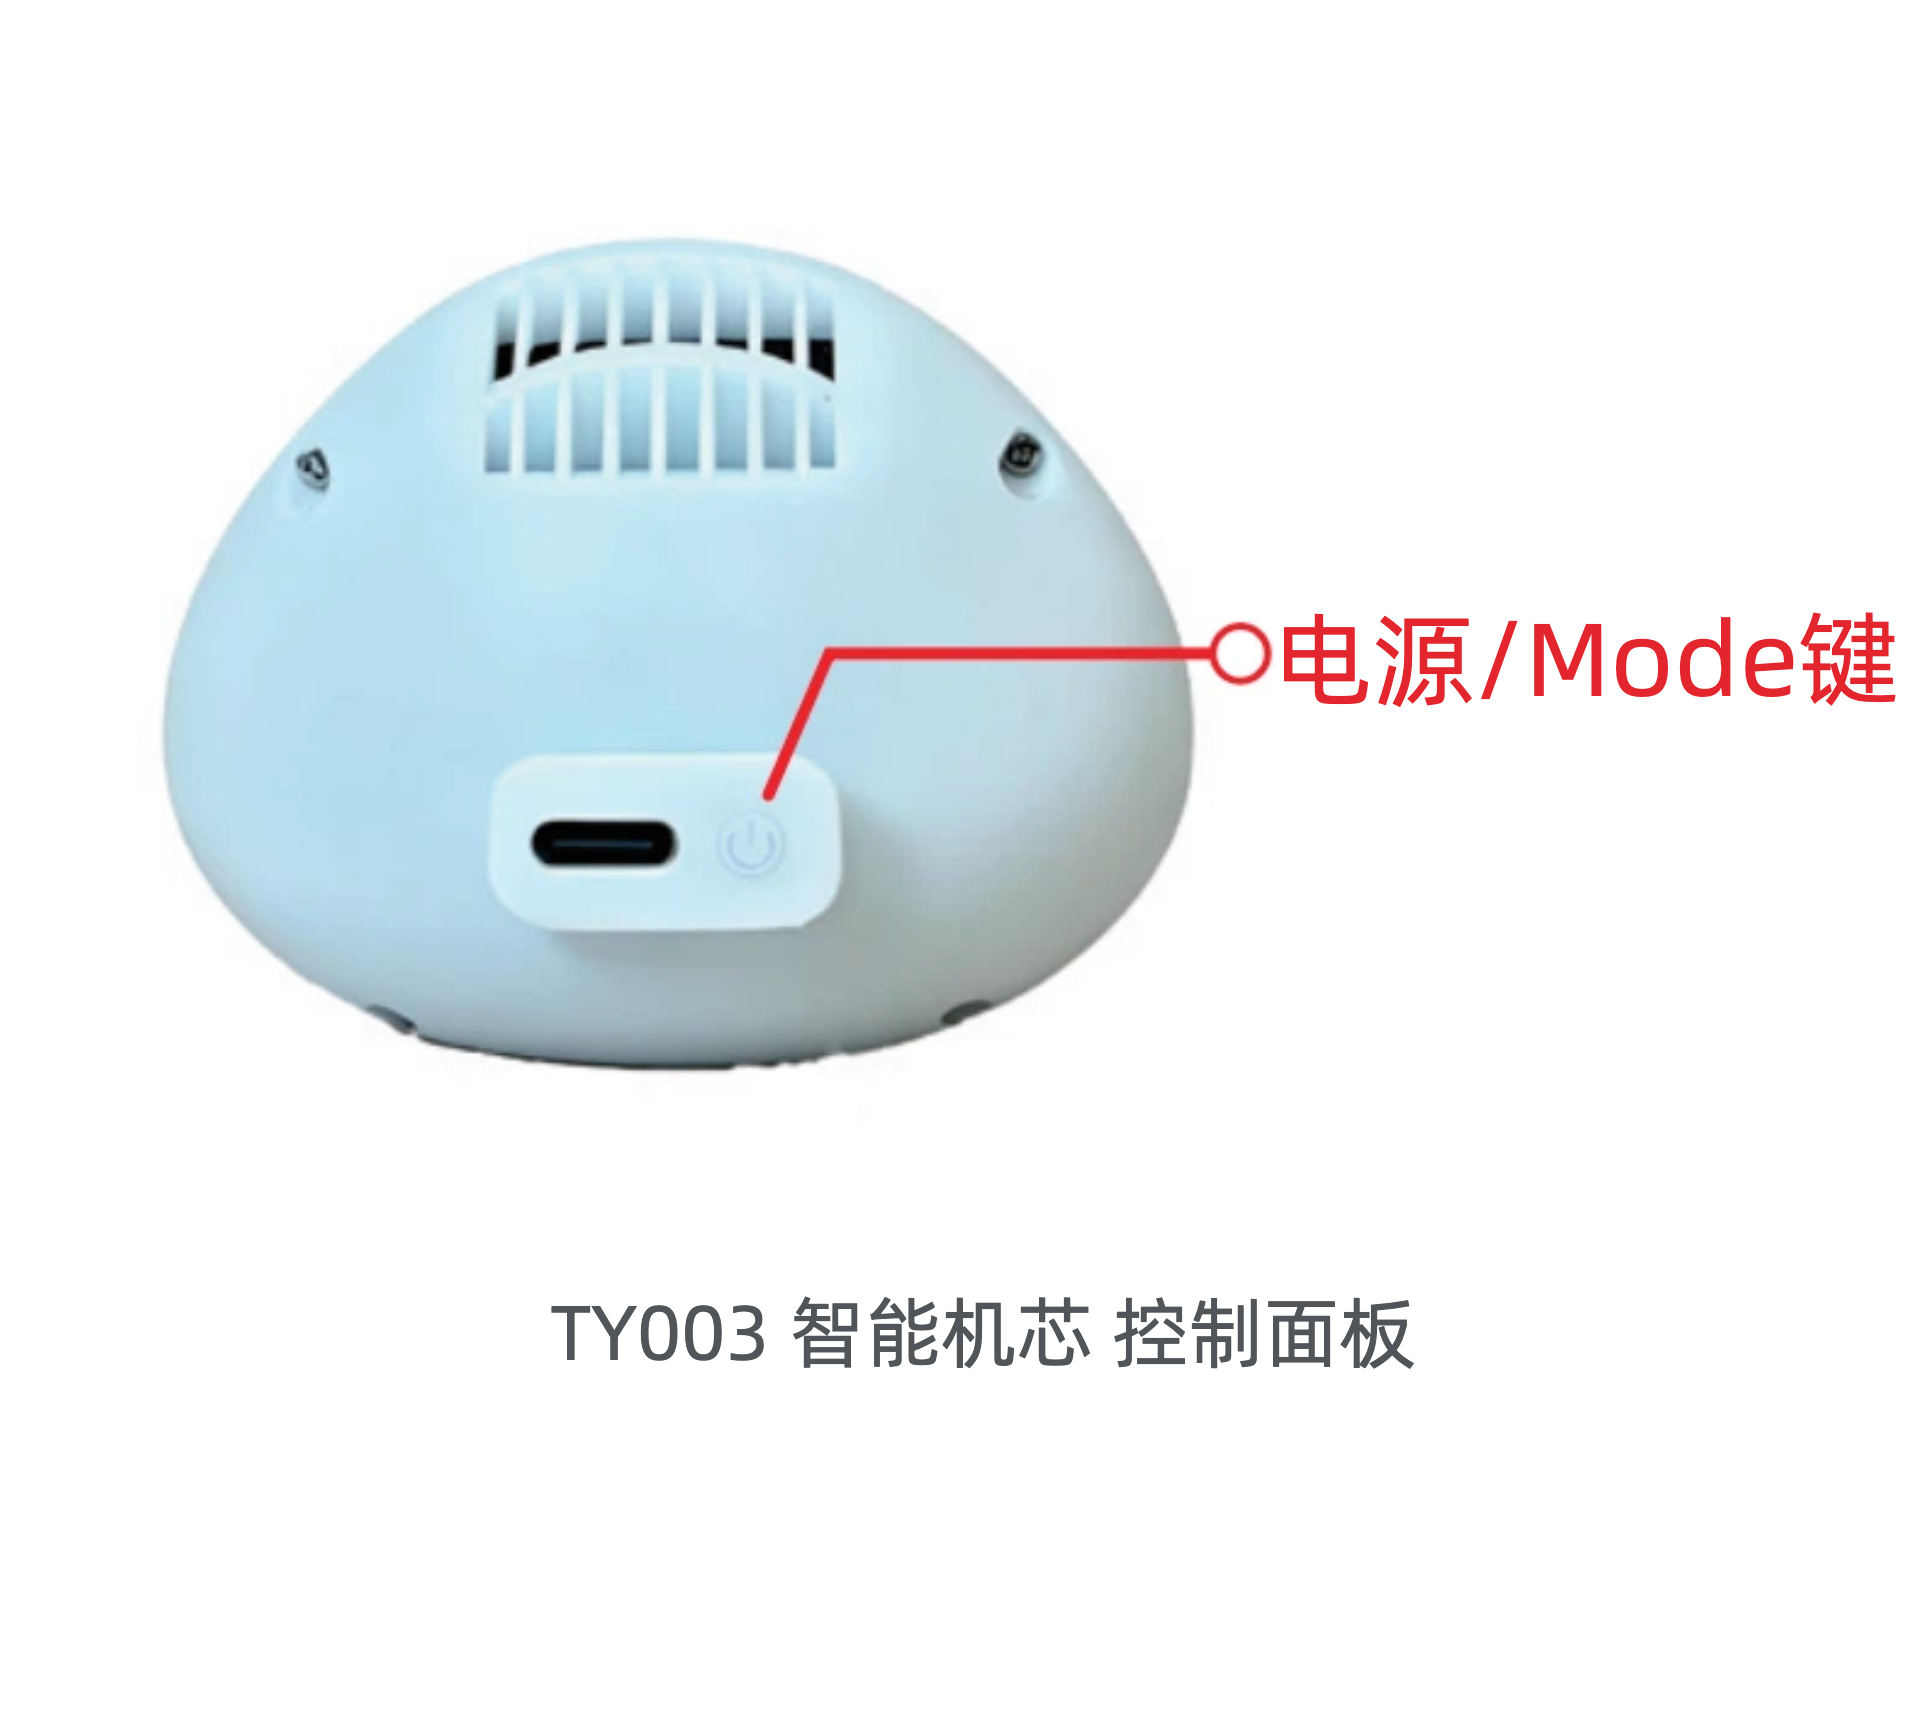
TY003 (Sphere Edition)
| Action | Description |
|---|---|
| Power on | Press and hold the Power / Mode button |
| Power off | Press and hold the Power / Mode button |
| Network configuration | Press the Mode button rapidly three times in a row |
| Mode switching | Double-press the Mode button (cycles between push-to-talk, free conversation and playback mode; playback mode is supported only on the F / S editions) |
| Button wake | Single-press the Mode button (wakes the module from standby without using the voice wake word) |
2. Hardware Specifications
The TY module ships with its peripherals already assembled and is ready to use out of the box. Hardware specifications for each module are listed below:
| Module | Specifications |
|---|---|
| Eye screens | Supports 0.71" / 0.90" / 1.28" round screens and a 0.85" square screen |
| Speaker | TY001: 8Ω 2W; TY002: 4Ω 3W box speaker |
| Microphone | High-sensitivity digital microphone, effective pickup range 3 m |
| Touch module | Capacitive touch sensing, for housing thickness ≤ 3 mm (A/F/S editions) |
| Vibration motor | Micro eccentric motor with linked touch/gravity feedback (A/F/S editions) |
| Push button | TY001: slide switch; TY002: push button |
| Power | Type-C charging, DC 5 V input |
| Battery | TY001: 600 mAh;TY002: 1000 mAh;TY003: 1200 mAh |
| Camera | S edition only; supports object recognition, image recognition and picture-book reading |
| Connectivity | Wi-Fi + BLE; 4G Cat.1 optional |
| 4G policy | 4G first; switches to Wi-Fi automatically when there is no signal |
3. First Power-On
3.1 Charging
Connect the module with the Type-C charging cable; the indicator LED showsred, meaning it is charging. The LED goes out when charging is complete.
3.2 Power On
- TY001 (split version): slide the switch to ON and wait for the screen to light up.
- TY002 (all-in-one version): press and hold the power button for 5 seconds, and the screen lights up to confirm power-on.
- TY003 (Sphere Edition): press and hold Power / Mode button,the indicator lights upand the screen lights up — the module is now on.
3.3 Confirming Power-On Status
After power-on, the module runs a self-check. When you hear the voice prompt "I'm ready to be set up" , the module is ready for app provisioning.
| Status | Description |
|---|---|
| Voice prompt: "I'm ready to be set up" | The module is ready for app provisioning (default on first power-on) |
| Voice prompt: "I'm online" | The module is connected to the network and ready to use |
4. App Provisioning and Use
4.1 Download the App
The TY Series module is provisioned and managed with the Tuya Smart app (China) or Tuya Smart App (overseas). There is no need to develop your own app — it works straight out of the box.
| Market | App name | How to download |
|---|---|---|
| Mainland China | Tuya Smart | Search your app store for "Tuya Smart" |
| Overseas | Tuya Smart | Search the App Store / Google Play for "Tuya Smart" |

4.2 Sign Up / Log In
Open the app, register a Tuya Cloud account with your phone number or email address, and log in.
4.3 Add a Device


4.4 Connect to the Network
Method 1: Wi-Fi provisioning (default)
- Select the 2.4GHz Wi-Fi network you want to join.
- Enter the Wi-Fi password and tap "Next".
- The app sends the network information to the module over Bluetooth; wait for the connection to complete.

Method 2: 4G network (optional 4G edition)
- Insert the SIM card and power on; the moduleuses the 4G network first。
- When the 4G signal is weak or unavailable, the moduleswitches to Wi-Fi provisioning mode automatically。
- You can still configure Wi-Fi in the app as a backup network.
4.5 Provisioning Complete
When provisioning succeeds, the app shows "Device added"; tap "Done" to finish.

Return to the app home screen and you will see the device card for the module. Tap it to check device status, start a voice conversation and manage settings.

5. Boosting 4G and Wi-Fi signal
While connected over 4G, you can add a backup Wi-Fi network in the app and turn on Wi-Fi boosting to make the module's connection more stable.
5.1 Opening network settings
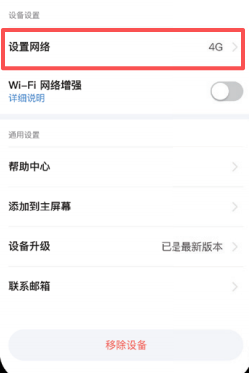
Once the device is connected, tap Settings in the menu at the top right of the device edit page, then scroll to the bottom and find Network Settings。
5.2 Adding a backup network
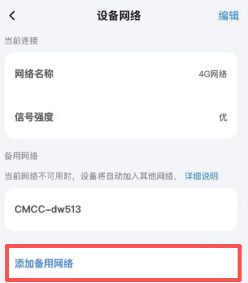
Tap Network Settings On the next screen, tap Add backup network。
5.3 Enabling Wi-Fi boosting
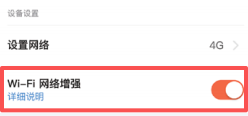
Once the backup network is added, go back to the network settings screen and turn on the Wi-Fi boosting switch.
6. Network reset
To change the Wi-Fi network, provision again, or switch between 4G and Wi-Fi, proceed as follows:
TY001 (split version)
- Make sure the module is powered on.
- Quickly slide the switch to OFF and wait for the screen to go dark.
- Then slide the switch back to ON and wait for the screen to light up.
- Repeat the steps above 3 times。
- After the screen lights up the third time, you will hear the voice prompt "I'm ready to be set up", which means the reset succeeded.
- Open the app and add the device again.
TY002 (all-in-one version)
- Make sure the module is powered on.
- Press and hold the MODE button on the unit without releasing it.
- Keep holding for about 7 seconds。
- , until you hear the voice prompt "I'm ready to be set up", which means the reset succeeded.
- , then release the MODE button, open the app and add the device again.
TY003 (Sphere Edition)
- Make sure the module is powered on.
- Press rapidly and repeatedly Power / Mode button 3 times.
- , until you hear the voice prompt "I'm ready to be set up", which means the reset succeeded.
- Open the app and add the device again.
7. Voice interaction
Once provisioning succeeds, the module is connected to a cloud LLM and supports natural-language conversation.
7.1 Wake Word and Conversation
- Say the wake word to the module:"Hi, Tuya" (Chinese edition) or 「Hey, Tuya」 (English edition)
- After the prompt tone, say your question or command.
- The module replies in real time through the cloud AI.
Sample conversations:
- "Hi, Tuya, what's the weather today?"
- "Hi, Tuya, tell me a story."
- 「Hey, Tuya, what is the weather today?」
- 「Hey, Tuya, sing a song for me.」
7.2 Multilingual Support
The TY Series supports 80+ languages TTS/ASR, including English, Japanese, Korean, Arabic, Hindi and more. Change the language in the device settings in the app.
7.3 Switching Conversation Modes
The TY Series module supports two conversation modes. Switch between them bydouble-pressing the external button or MODE button.
7.4 Free Conversation Mode
In free conversation mode, you can interrupt the module at any time: just say a new command or question and the module responds immediately.
7.5 Button Conversation Mode
In button conversation mode, the module does not respond to new voice input while it is speaking. To interrupt it, you need tosingle-press the external button or the MODE button; once the module finishes speaking, you can talk to it directly.
8. Motion interaction A/F/S editions
The TY Series module has multiple built-in sensors for rich motion interaction (A/F/S editions):
| Interaction | Action | Module response |
|---|---|---|
| 👆 Touch sensing | Touch the panel or the touch area on the body | Voice response + vibration feedback |
| 🤚 Shake detection | Shake or tilt the module | Triggers an interactive action or voice response |
| 📳 Vibration feedback | Triggered automatically | Provides haptic feedback during conversation or interaction |
| 😊 Emotion recognition | During natural conversation | The AI detects emotion and adjusts its tone |
9. Local content playback F/S editions
The module supports Local TF card playback, so preloaded content can be played without a network connection (F/S editions).
9.1 Switching Modes
Double-pressthe external button or MODE button to switch modes. Once you switch to playback mode, local music on the TF card plays.
9.2 Updating TF Card Content
- Remove the TF card from the module (in the card slot on the side of the body).
- Connect it to a computer with a card reader.
- Copy audio files (MP3/WAV) to the root directory of the TF card.
- Reinsert the card into the module;after a restart it is recognized automatically.
10. Camera recognition interaction S edition
If your sample is equipped with the optional camera module (S edition), the module supports AI vision interaction:
| Feature | Description |
|---|---|
| 🔍 Object recognition | Point it at an object; the module identifies it and describes it by voice |
| 🖼️ Image recognition | Recognizes image content and explains it interactively |
How to use:
- Make sure the module is online.
- Place the object or image 10–30 cm in front of the camera.
- The module recognizes it automatically and responds interactively by voice.
11. Specification quick reference
| Parameters | TY001 split version | TY002 all-in-one version |
|---|---|---|
| Main unit dimensions | 3.9 × 4.0 × 3.0 cm | 5.4 × 4.3 × 3.0 cm |
| Panel dimensions | 5.3 × 2.1 cm | — |
| Main Control Platform | Tuya IoT module | Tuya IoT module |
| Display | 0.71" / 0.90" / 1.28" × 2 | 0.71" / 0.90" / 1.28" × 2 |
| Camera | Supported (optional on the S edition) | Supported (optional on the S edition) |
| Connectivity | Wi-Fi + BLE; 4G Cat.1 optional | Wi-Fi + BLE; 4G Cat.1 optional |
| 4G policy | 4G first; switches to Wi-Fi automatically when there is no signal | 4G first; switches to Wi-Fi automatically when there is no signal |
| Battery capacity | 600 mAh | 1000 mAh |
| Speaker | 8Ω 2W | 4Ω 3W |
| Shake detection | 3-axis gyroscope (A/F/S editions) | 3-axis gyroscope (A/F/S editions) |
| Touch detection | Touch module (A/F/S editions) | Touch module (A/F/S editions) |
| Vibration motor | Yes (A/F/S editions) | Yes (A/F/S editions) |
| Local storage | TF card (F/S editions) | TF card (F/S editions) |
| Wake word | "Hi, Tuya" / "Hey, Tuya" | "Hi, Tuya" / "Hey, Tuya" |
| AI conversation | Cloud-based (Tuya general-purpose model) | Cloud-based (Tuya general-purpose model) |
| Companion app | Tuya Smart (China) / Tuya Smart (overseas) | Tuya Smart (China) / Tuya Smart (overseas) |
| Device housing | ABS, white | ABS + PC, white |
12. Troubleshooting
| Problem | Possible cause | Solution |
|---|---|---|
| No "I'm ready to be set up" prompt | An old network configuration is saved | Reset the network as described in Chapter 5 |
| The app cannot find the device | Bluetooth is off / device is too far away | Turn on Bluetooth on your phone and move within <1m of the module |
| Provisioning failed | Wi-Fi is 5GHz / password is wrong | Switch to a 2.4GHz Wi-Fi network and check the password |
| No voice response | Network disconnected / microphone blocked | Check the network connection and make sure the microphone is not blocked |
| No response to touch | Panel is not fully seated (TY001) | Reseat the panel and make sure it makes good contact |
| No sound during playback | Volume too low / speaker blocked | Turn up the volume and check whether the speaker is blocked |
| 4G connection unavailable | SIM card not seated properly / no signal | Check that the SIM card is installed and confirm carrier coverage |
| Camera not recognizing | Camera not fitted / insufficient light | Confirm the unit has the optional camera and improve the lighting |
13. Safe use
- Do not use in humid, high-temperature or flammable environments.
- Adult supervision is recommended for children to prevent swallowing small parts.
- Disconnect the power supply if the device will not be used for a long time.
- Do not disassemble the module yourself, as this may cause damage or void the warranty.